How to Use Instagram Edits App
Instagram has over 2 billion monthly users — now it has its own editing app
It’s finally here. Instagram Edits, announced shortly after the short-lived CapCut ban, is Instagram’s response to the growing demand for mobile editing tools focused on short-form content. The app is built specifically for video and image editing, positioning itself as a direct competitor to TikTok’s proprietary editor. In short, it’s Instagram’s take on CapCut.
For influencers, social media managers, and casual video creators who rely heavily on Instagram, Edits could become a game-changer.
Here’s everything you need to know about Instagram Edits, including how to use its most powerful tools and how to create videos optimized for Instagram.
Table of Contents
- What is Instagram Edits?
- How to Access Edits
- How to Use Instagram Edits (Creating and Posting Videos)
- Navigating the Edits App
- Coming Soon to Edits
- Frequently Asked Questions
What is Instagram Edits?
Edits is the latest tool from Meta, created to streamline the editing process for video and image creators on Instagram. Think of it as a companion to Instagram’s existing creative features, like Instagram Insights.
At its core, Instagram Edits is built for speed and simplicity. It enables creators to quickly produce content and publish it directly to Instagram. Videos made with Edits are exported without watermarks and include access to engagement stats, helping you track what’s working and experiment with new ideas.
During a release call hosted by Meta, product manager Tom Bender shared that the goal of the Edits app is to master the basics of video editing and eventually become "the most accurate and reliable editor on mobile."
How to Access Edits
Edits is now available for download on both iOS and Android devices through the App Store and the Google Play Store. Currently, there is no desktop version of Edits, and the product team at Meta has stated that a desktop editor is not a high priority, so for now, editing remains mobile-only.
One of the most common questions: is Edits free? The answer is yes. Edits is free to download and use. In an Instagram Q&A session shortly after the app’s announcement, Adam Mosseri elaborated:
"I think over time, we might have some paid features where we’re going to need to cover costs of things, like compute for big AI features. But in general, we want to create as many features that are free as possible, because the more people can create, the more they will create, the better Instagram will be, and the more we will all benefit."
Currently, all editing features on Edits are free and fully available to the public.
How to Use Instagram Edits (Creating and Posting Videos)
Once downloaded, you'll be greeted with a simple login screen that automatically links to any Instagram accounts currently signed in on your device.
To log in with the suggested account, tap the large button in the center of the screen. If you need to switch accounts, select Switch accounts at the bottom.

Linking to the correct account is important, as Edits allows you to publish videos directly to Instagram after editing.
To ensure your content is posted to the right place, make sure you're logged into the correct Instagram account.
Creating a New Project
There are two ways to start a new project on Instagram Edits.
First, you can tap the + icon to upload images or videos from your device’s camera roll.
Second, you can select the recording icon to capture content directly within the app.

While both options are straightforward, there are a few key differences. Uploading files from your device automatically imports them into a new project for editing. Capturing content within the app, however, gives you access to real-time filters and effects, such as green screen, that can be applied while recording.
This streamlines your editing process and helps you create content more efficiently.
Here’s a closer look at the capture tools, including how to use them to speed up your workflow.
Integrated Camera Tools — Green Screen, Touch-Up, and More
Accessible from the icon list on the left-hand side of the screen, these tools make it easier to capture pre-edited content and save time during the actual editing process.
To use any of the tools, simply tap on their icon.

Let’s take a look at each tool individually to see what they do and how to use them in your next project.
1. Music Library
The music and audio library is a great way to create videos with embedded audio. Especially useful for choreographed content like dance videos, selecting music from this screen will play the audio during recording, allowing you to time actions and scenes with the beat.
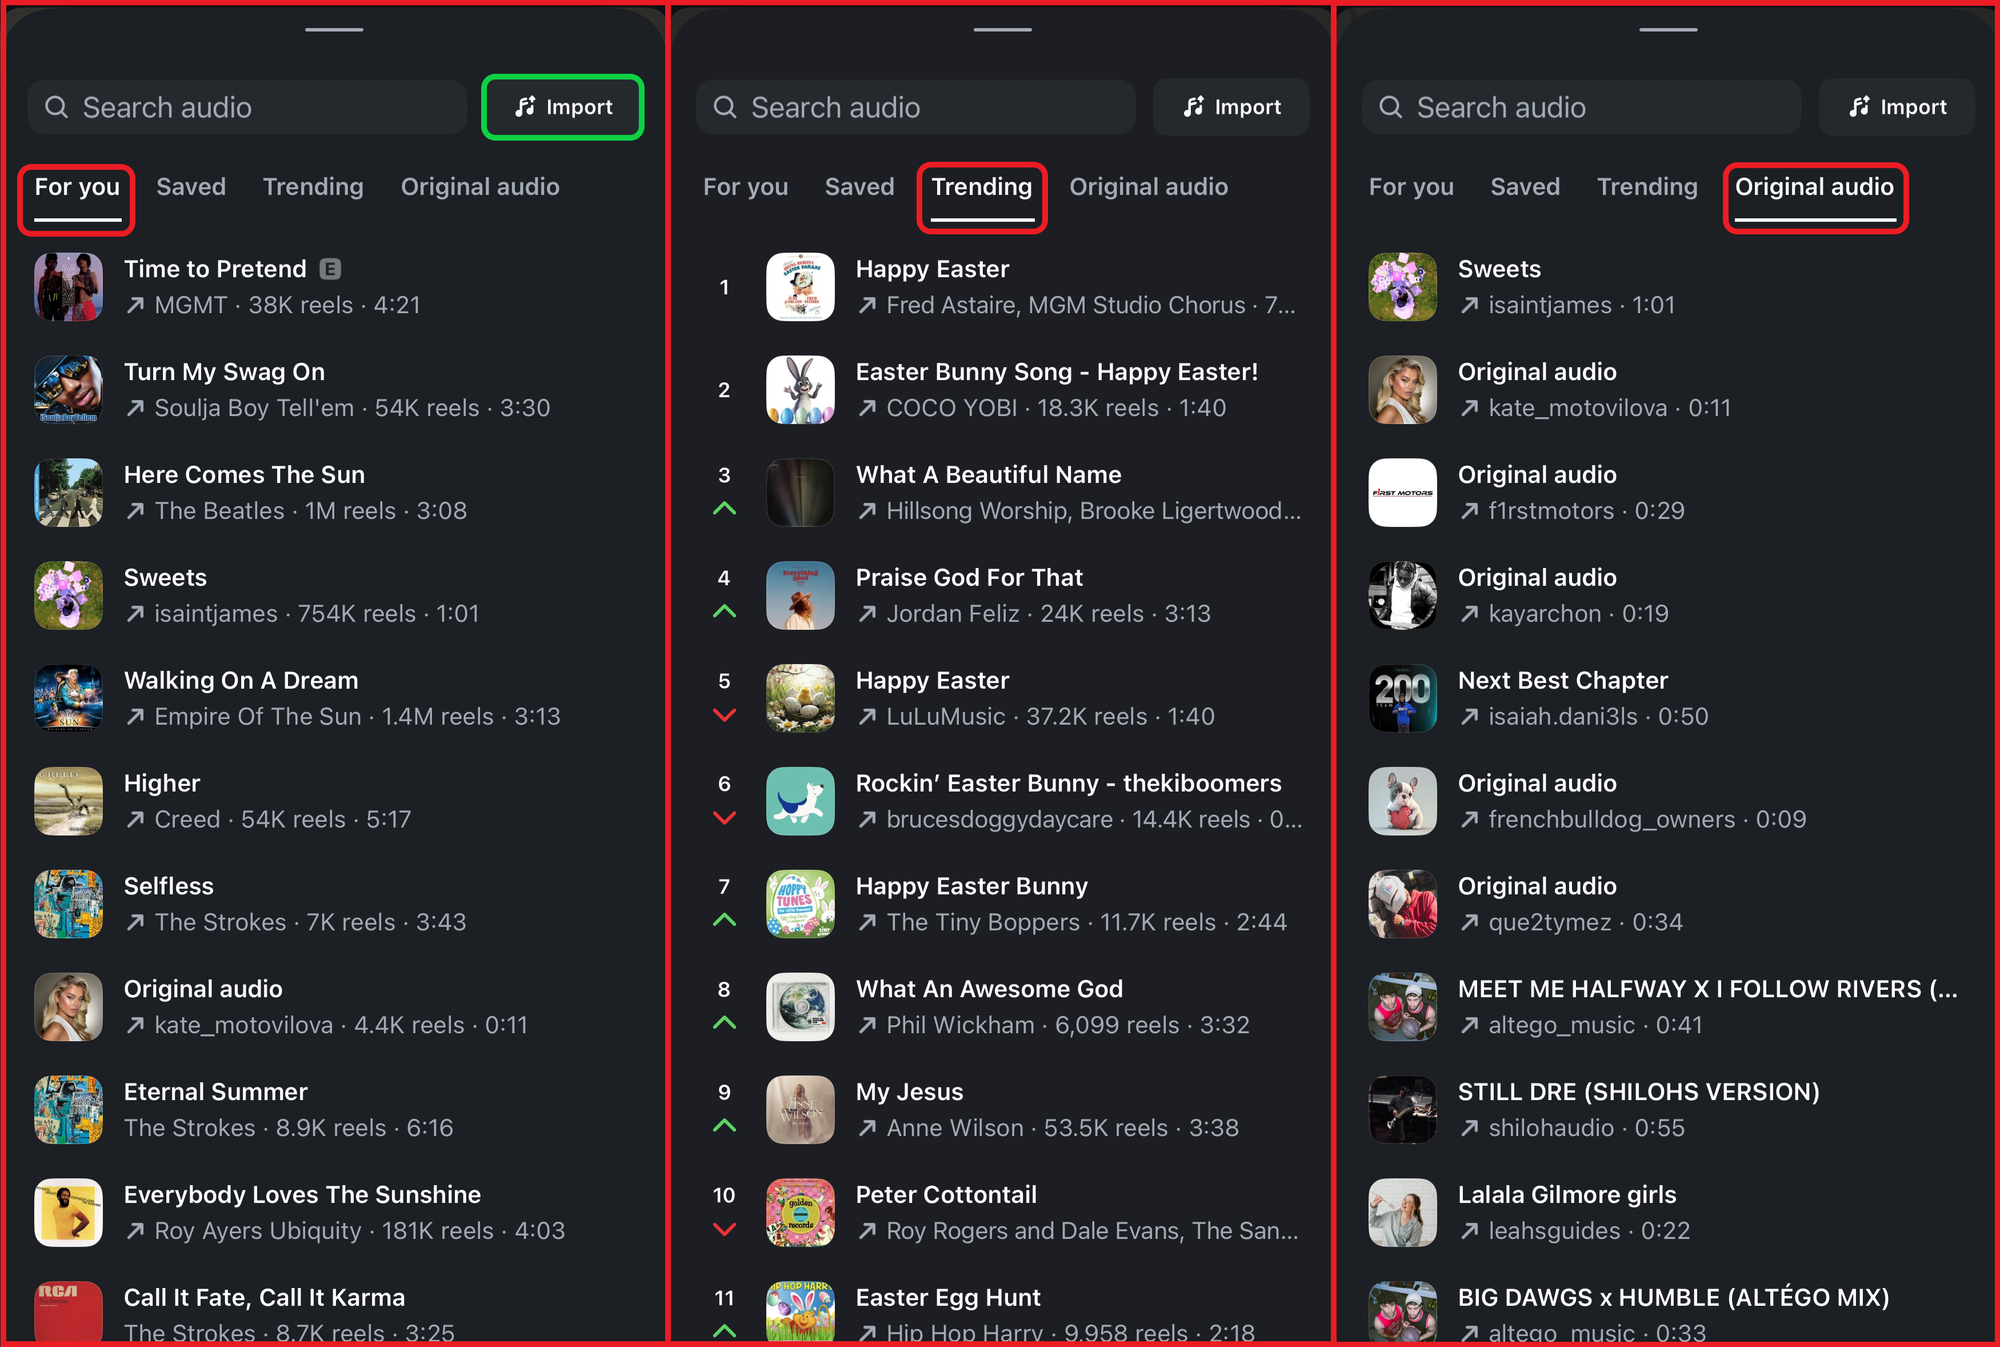
The library is conveniently segmented to help you find relevant audio more easily. You can sort by For you, Trending, or Original audio to explore a range of options. In the Trending tab, you can even catch on to rising audio clips that are still gaining popularity.
To add your own audio to the Edits app, tap the Import button at the top of the screen. This lets you upload audio files directly from your device.
2. Green Screen
“Talking head” content continues to be a strong format for short-form videos. Whether you're reacting to a viral clip, showcasing your work, or offering commentary in front of a visual reference, recording with the green screen tool helps you skip extra editing steps.
After enabling the tool, tap Change background to upload any image from your camera roll. You can then capture photos or videos with your selected background.
To change it again, tap the same button.

For best results, make sure you're well lit and maintain a strong contrast between yourself and your physical background. Poor lighting and low contrast can reduce the effectiveness of the green screen effect.
3. Countdown
The countdown tool is simple but highly useful when capturing content. Since high-production videos often combine multiple shot types, such as handheld and stationary, using a timer helps reduce the need for trimming during edits.
Once you open the tool, you can set the countdown duration to 3, 5, or 10 seconds.
You can also adjust the Clip length slider to automatically limit your video’s duration. The slider uses seconds, so you might need to do quick conversions as needed. The maximum duration is 600 seconds, or 10 minutes.

4. Touch-Up
Finally, the touch-up tool applies a subtle, automatic filter to your video, smoothing out surfaces slightly.
Here's a comparison of the effect with and without the filter.

The effect is subtle — very subtle.
While it’s unlikely to significantly impact your video’s performance, it’s useful for creators looking to apply light airbrushing instantly.
For a more hands-on experience editing the brightness, saturation, blur, and colors of an image or video, consider using a third-party Color Correction tool that allows a greater degree of accuracy.
Editing Your Video
Whether you capture your content within the app or upload clips from your camera roll, editing in Edits is straightforward.
Inside the editor, there are three main areas to focus on:

- Project Settings: The top toolbar is useful for applying settings that affect the entire project. Here, you'll see your project’s name (defaulted to “new project”), resolution options, and the export menu.
- Project Timeline: If you’ve edited a video before, this will feel familiar. The timeline is where you arrange your clips in chronological order. It's also where you add layers like transitions, music and audio, or overlaid content.
- Project Toolbar: This section is used to add and create elements like text, automatic captions, stickers, and more. One standout feature here is Cutout, which uses AI to automatically mask subjects, allowing you to drag and drop them into other projects.
In addition to these core tools, new options become available when you select an individual clip from the timeline.

These tools apply only to the selected clip, not to the entire project. Some of the most useful ones include:
- Split: Divide your video clip at the current playhead position.
- Speed: Adjust the playback speed to either slow down or speed up the clip. This is ideal for adding pacing variation or dramatic effect.
- Filters: Apply preset color filters similar to those on Instagram to match your desired visual style.
Another key feature in Edits is its precise trimming and alignment within the timeline — something rarely seen in mobile editors. To access this, simply pinch to zoom in on the video timeline. You’ll notice the units shift from S (seconds) to F (frames), indicating frame-level precision.

This level of control is especially helpful for creators aiming to produce snappy, fast-paced videos with clean, tight edits.
Posting to Instagram
Once you're finished editing, tap the Export button in the top right corner of the editor to begin exporting your video.
While the video processes, a loading screen will appear so you can track its progress. Avoid turning off your phone or closing the app during this time, as doing so may cause the export to fail.

After the export is complete, a copy of your video will automatically be saved to your camera roll. This version is watermark-free and ready to be posted on any platform. To upload your video directly to Instagram, simply tap the Share to Instagram button on the final export screen. This will automatically post your video to your connected account.
It’s important to note that videos shared to Instagram through this button will include a small tag that says “made with edits.” While this tag cannot be disabled in the app, there is a simple workaround detailed in the FAQ section at the bottom of this article.
Navigating the Edits App
Along the bottom of the Edits app is the navigation menu, offering a quick way to move between the app’s main areas.

While we’ve already covered some sections like the landing screen (3) and the recording screen (4), let’s go over each one so you can navigate the app with confidence.
1. Ideas
The Ideas tab simplifies a process on Instagram that’s typically more complicated. Instead of digging through menus to find saved content, all videos you've saved on Instagram automatically appear in this tab. This makes it much easier to organize content for different purposes.
Additionally, the Ideas tab includes sticky notes for jotting down content ideas you want to revisit later, offering a more complete way to plan your content in advance.

2. Inspiration
The Inspiration tab is a vertical video feed integrated into Edits, but it operates a bit differently than your standard Instagram Reels feed. This section is designed to highlight trending audio and expose you to content that may not appear in your main Reels algorithm.
When browsing this tab, you can tap Use audio to start a new project with that sound. You can also use the save options to the right to store the video in your Ideas tab for later use.

Overall, this tab is a great resource for discovering and using trending audio to help your videos gain more traction.
3. Home
The Home tab is the app’s main landing screen and the default starting point for creating new projects.
From here, you can also filter your existing projects or switch between accounts. These options are available in the top-right corner of the screen.

4. Record
As covered earlier, the Record tab is where you can capture new content directly within the app. It’s designed to streamline the editing process by letting you apply tools while filming, which reduces the need for additional edits afterward.
5. Insights
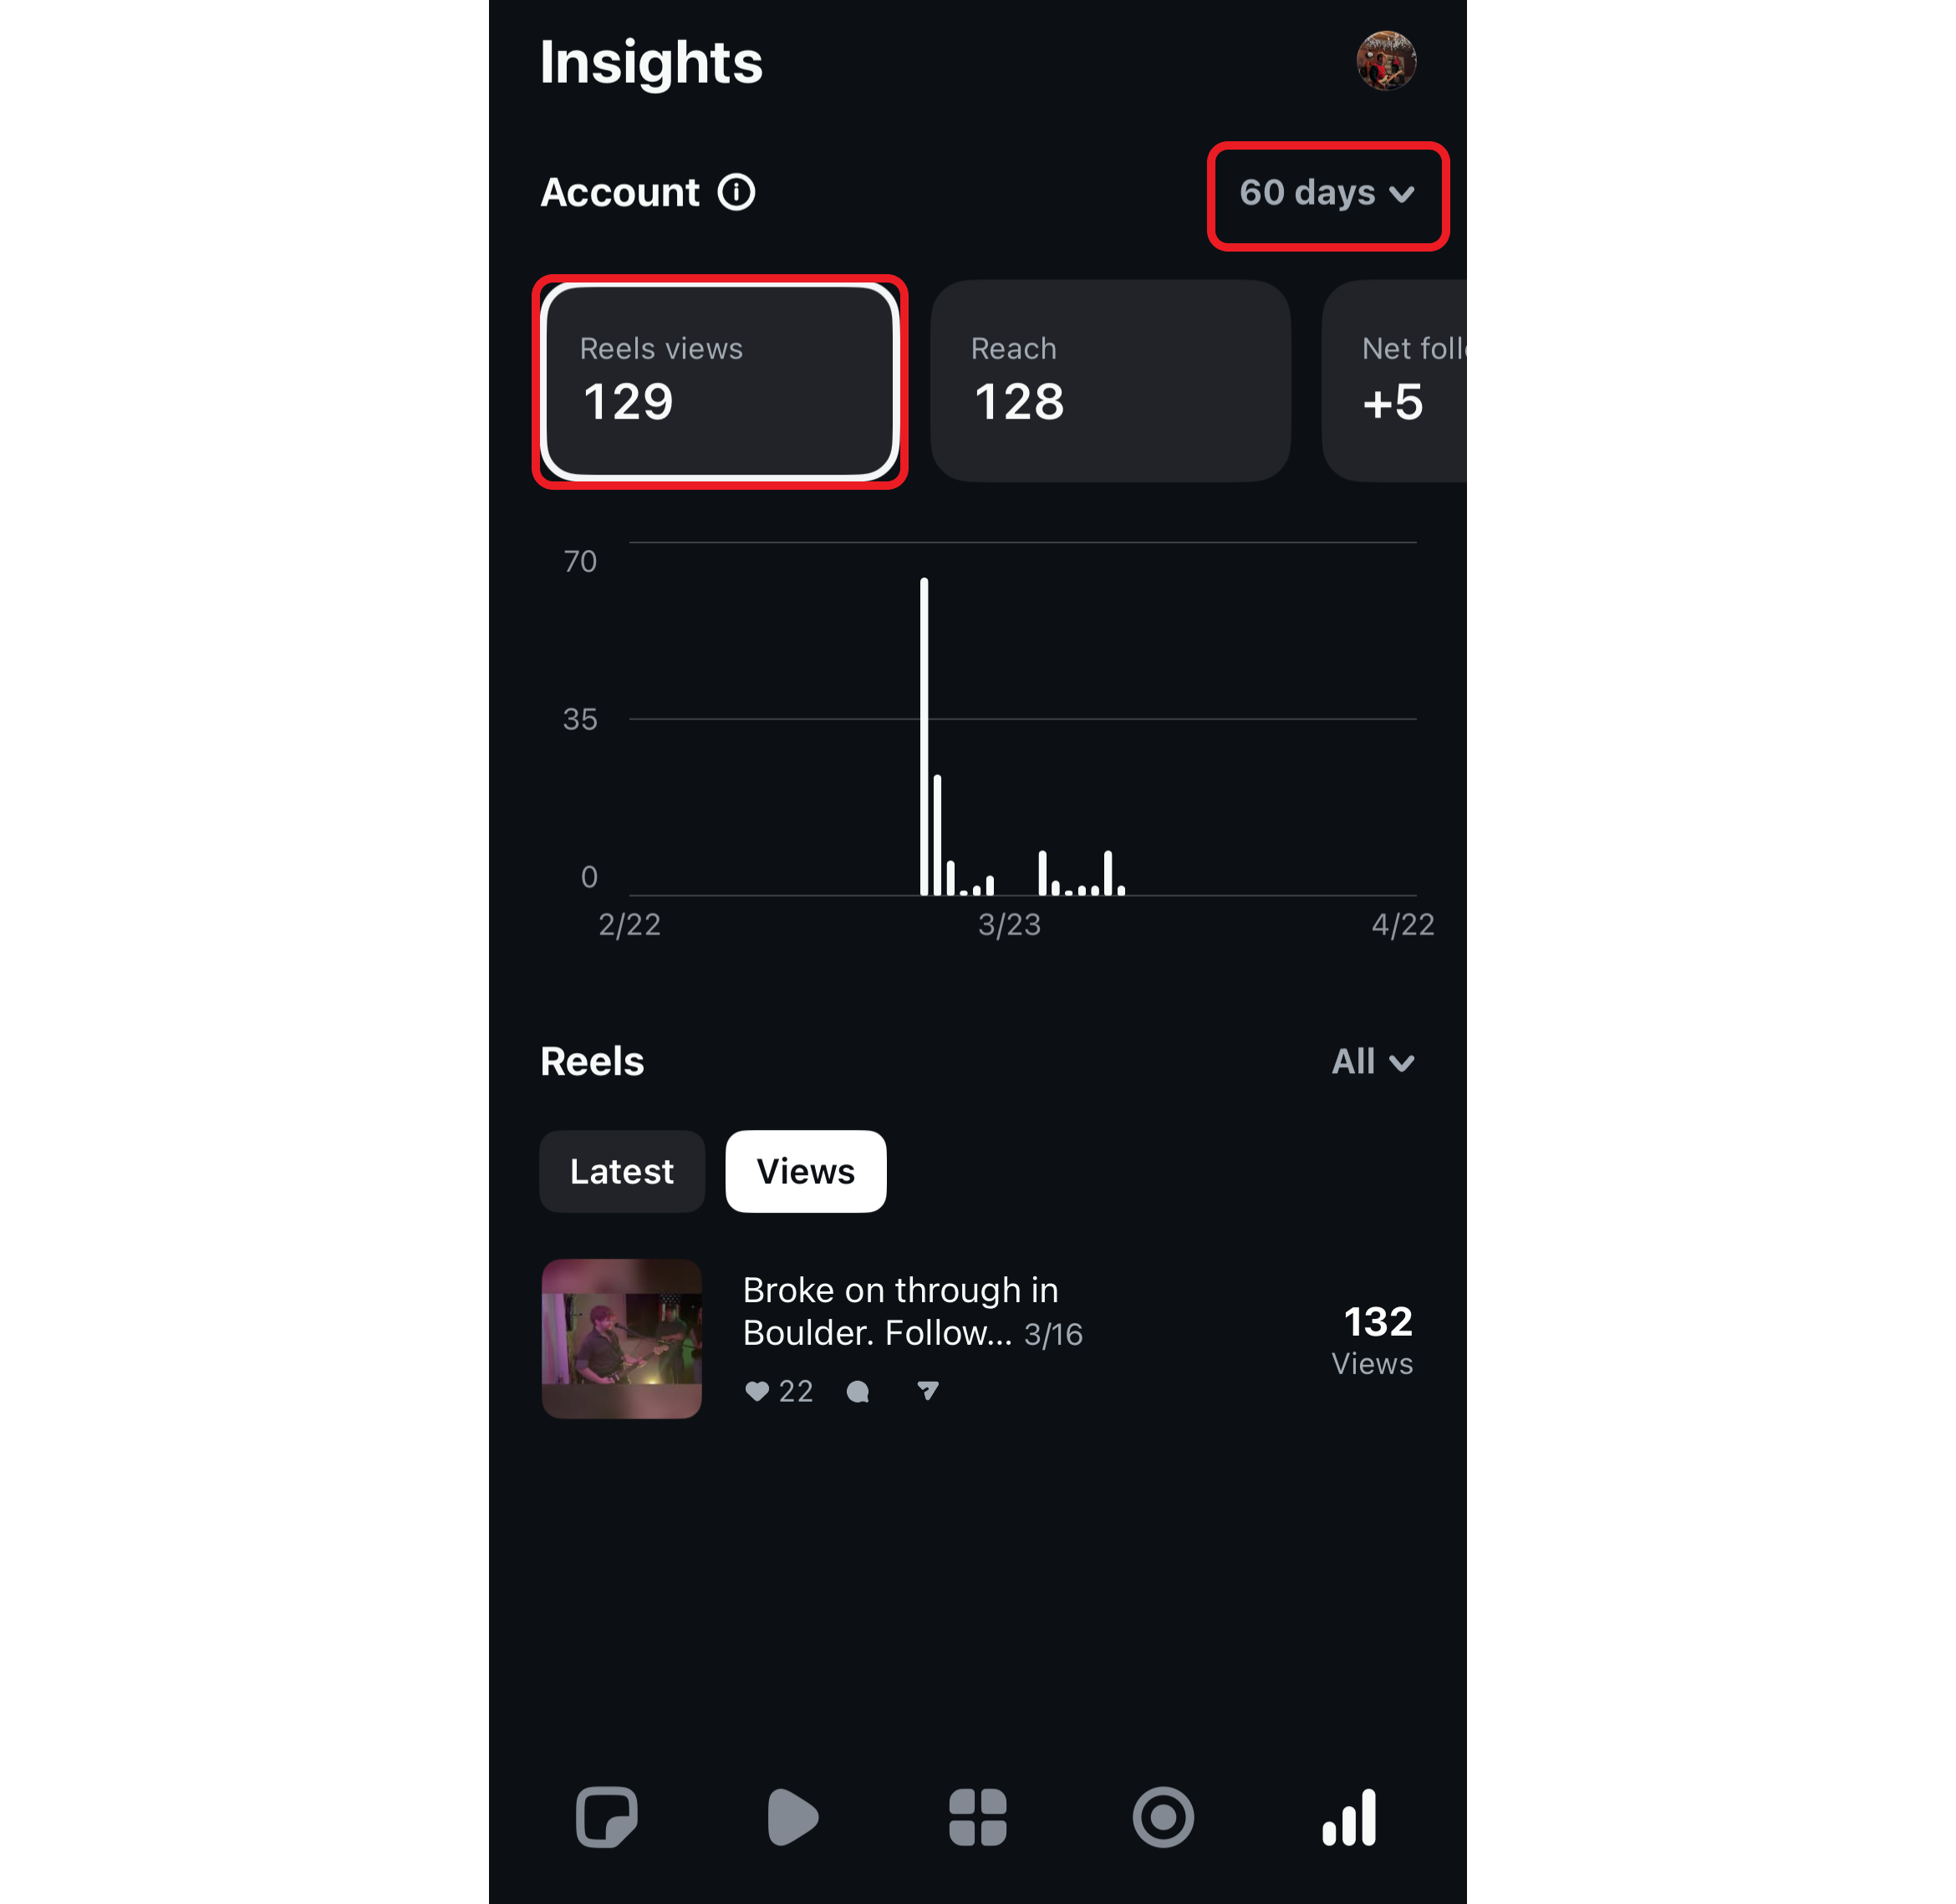
The Insights tab provides quick access to engagement metrics so you can monitor the performance of your videos and account. This tool is especially helpful for comparing individual video results and identifying your most successful posts. When paired with other Instagram tools like trial reels, the insights found on the Edits app are a tremendous creator tool that should be used frequently.
To analyze your data, simply tap on a desired metric, such as reels views or reach, and adjust the timeline to ensure your results are relevant.
Coming Soon to Edits
In addition to the features already available, several exciting creator tools are on the way to the Edits app. While not ready at launch, these upcoming additions aim to expand what creators can do directly within the platform. Here are the biggest ones to keep an eye on:
Collaborative Editing
Instagram has been emphasizing collaboration tools since late 2024. Building on the recently introduced Blends feature, the Edits app is set to receive a collaborative editing tool that allows multiple creators to work on the same video project simultaneously. This will make it easier to produce shared content without needing to manually transfer files.
We don’t yet have full details on how this feature will function or whether it will be rolled out universally, but it is expected to arrive sometime in 2025.
AI "Modify" Tool
Already in testing, the Modify tool is a generative AI feature that’s designed to transform the theme of a video with a single tap. For example, it might let you turn a subject into a pirate by changing their outfit and adding a matching animated background.
At launch, this tool is expected to include a limited number of preset modifications. Over time, it will evolve into a prompt-based tool where creators can describe the changes they want and have them generated automatically.
Keyframes and Other Advanced Editing Tools
Keyframes are essential for adding precise movement and professional transitions to your content. Whether you’re animating text, images, or clip positions, keyframes give editors greater control. Though not yet available in Edits, they are confirmed to be in development.
Additional tools expected to roll out include custom font uploads, advanced filters and animations, and a royalty-free music library. Of these, royalty-free music will be especially useful for business accounts and creators producing commercial content, who are currently unable to use much of the existing music library on Instagram or Edits.
Frequently Asked Questions
On April 23, 2025, Meta hosted a release call for social media managers and online influencers to provide a deeper look at the Edits app. The session included a Q&A with Tom Bender, the product manager overseeing Edits. Here are some of the key questions that were answered during the call:
Will videos created on Edits receive a boost in the Instagram algorithm?
In the short term, yes. Videos created using the Edits app — especially those showcasing how to use the app — are likely to receive increased visibility on Instagram as a way to promote the tool. However, this advantage is not expected to continue in the long term.
Is there any way to save brand colors or fonts?
At this time, there is no way to save custom colors, fonts, or assets for use in a brand kit. That said, this feature is on the roadmap and is expected to be added in a future update.
Can I remove the “made with edits” tag from my Reels?
Videos posted directly from the Edits app will include a small attribution tag that reads “made with edits.” This tag cannot be removed through the app, but there is a workaround. By downloading your edited video and uploading it manually from your camera roll, you can avoid having this tag appear on your Reels.
How are insights different on the Edits app?
Insights — or video engagement metrics — differ on the Edits app as they are more accessible than on Instagram. Built to mirror a stocks app, metrics are easily visible using real-time bar graphs that constantly update to reflect stats like views, net followers, likes, comments, and more.
Are safe zone templates available in Edits?
Currently, safe zone templates — which let you view a platform’s interface overlay while editing — are not available. However, they are considered a high-priority feature by the development team.
Can anybody use the music on Edits?
No. Business and commercial accounts are not permitted to use music from Edits in their content, as Instagram does not hold a commercial reproduction license for those tracks. Users who are posting personal or non-commercial content are free to use any audio in the Edits music library.


